As we approach the new year, losing weight will be on the minds of many Americans. Here is an interesting article about some of the foods you may think are good for you, but aren't. And you'll notice that they are all processed foods!
The Truth About Your Weight Gain - 6 Foods To Avoid

Thursday, December 30, 2010
Sunday, December 26, 2010
A Poem
My mom shared this poem with me, and now I am sharing it with you. It's a nice reminder of the people involved in the food that nourishes us, and how that food connects us all.
Kneading Bread
by Belle B. Broadbent
While the dough I gently grasp,
I think of those who must clasp
Seed to sow the garden grain
And reap the harvest it contains.
And those who then work hour by hour
Turning this grain into flour.
While these joining clasping hands
Feed the hungry of the lands.
So I find a kinship spread
While I'm gently kneading bread.
Friday, December 17, 2010
Christmas Morning Breakfast
Christmas is a week away, and I've been busy baking cookies and making candies. I wanted to share a recipe that my family loves for Christmas morning. It's perfect served with real maple syrup and bacon! Merry Christmas to everyone!!
Eggnog-Spiced French Toast
serves 4
2 large eggs
12 oz. evaporated milk
2 tbsp. granulated sugar
2 tsp. rum extract
1/2 tsp. cinnamon
1/4 tsp. nutmeg
8 slices of firm, day-old bread
Nonstick cooking spray
Powdered sugar
Beat eggs, evaporated milk, sugar, rum extract, cinnamon and nutmeg in shallow dish until well blended. Place a few slices of bread into egg mixture, turning over to evenly moisten both sides. Spray a large skillet with cooking spray and heat over medium heat. Transfer prepared bread slices to skillet in a single layer. Cook for about 3 minutes on each side, or until golden brown. Remove slices to a serving platter. Repeat process for remaining bread slices. Sprinkle with powdered sugar. Serve immediately.
Thursday, December 2, 2010
Edible Landscaping
Below is a link to an interesting article about Rosalind Creasy, an environmental activist and author of Edible Landscaping. Creasy has started a movement to replace traditional American lawns with decorative fruit and vegetable gardens. She has proven that a vegetable garden can be beautiful and practical. Be sure to look at the slideshow that accompanies the article. I'm going to try and find a copy of her book!
Edible Landscaping article
Edible Landscaping article
Monday, November 29, 2010
Venison
It's deer season in Ohio, and as I write this, my husband is sitting in our woods with his shotgun. Venison is a very healthy meat. It has less fat, calories and cholesterol than beef. It is also wild, organic food.
Some people look at deer hunting as cruel, or as an activity for "rednecks." They couldn't be more wrong. My husband's family has been hunting deer for generations. It is a time-honored tradition. Deer are treated with respect and dispatched as quickly as possible. The meat is never wasted. It is a more humane way of getting meat than the methods used by factory farms that supply the supermarkets.
Because venison is so lean, it must be cooked carefully. It has a tendency to be tough if not handled properly. It's not a meat to be put on the grill. Tenderloins can be fried, but most of the cuts of meat should be cooked in sauce or gravy. Some people like to make summer sausage, but I'm not crazy about it myself. I like to prepare venison in the slow cooker with a mushroom gravy or hunter sauce. I also like to can it. Canned venison is almost like shredded beef and is very tender. The recipe below came from my husband's Aunt Cheryl in Minnesota. When canning, always be sure to follow your canner instructions carefully and use all food safety precautions.
Aunt Cheryl's Canned Venison
1. Make a bouillon brine, using 2 beef bouillon cubes to one 1 cup of water. (The amount you make will depend on how much meat you are canning.)
2. Cut venison into chunks.
3. Fill canning pint jars with meat up to 1 inch from top of jar. Add 4 tablespoons of bouillon brine and 1/2 tsp. of canning salt to each jar. Put lids on jars as directed in your pressure canner instructions.
4. Process venison at 10 lbs. of pressure for 75 minutes, or 15 lbs. of pressure for 60 minutes. Remove and cool as directed.
Monday, November 22, 2010
Happy Thanksgiving!
For most of us, this week will be a busy one! There is the Thanksgiving meal to plan and buy food for and cook. Or there are travel plans to make. Or both! And, of course, Christmas is just around the corner. But during this busy time, don't forget the reason for all the fuss. Remember that the Thanksgiving meal is a true blessing, and when you sit down to break bread with loved ones, it is the perfect opportunity to really think about what nourishes us. I wish you all a blessed Thanksgiving!
Friday, November 19, 2010
Great Fish Recipe
I've been looking for more vegetarian and seafood meals to cook for my family. It had been a while since I had found a great seafood recipe, though. My husband is a meat-and-potato kind of guy, and I need delicious recipes to get him to eat healthier. Last night I tried a recipe that I saw on David Rocco's Dolce Vita on the Cooking Channel. It was great! It uses a sweet and sour sauce made with balsamic vinegar. Very different, but delicious. The recipe calls for sea bass (or branzino), but I used tilapia. It worked great. The link to the recipe is below.
Branzino alla Max - Italian Fish Recipe
Branzino alla Max - Italian Fish Recipe
Monday, November 8, 2010
Soup Weather
It's November now, and the garden has now been put to rest for the season. Before pulling up my tomato plants, I picked the several green tomatoes that were still on the vines. I've been putting them in my kitchen window and letting them ripen there. They aren't the same as the tomatoes picked ripe off the vine, but they are good!
 Nothing tastes better on a grey November day than a hot bowl of soup! I've had the following recipe for years and have tweaked it over time. Everyone I've made it for loves it!
California Chicken Soup
64 oz. chicken broth (recommended: Imagine Organic Free-Range Chicken Broth)
1 pound chicken, cooked and cubed (recommended: organic, pasture-raised chicken)
1 small onion, diced
1 cup thinly sliced carrots
1 3/4 tsp. lemon pepper
1 tsp. oregano
3/4 tsp. garlic powder
1/2 tsp. parsley
2 bay leaves
15 oz. package of cheese tortellini
grated romano cheese
1. In a stock pot, combine all ingredients except tortellini and cheese. Bring to a boil.
2. Add tortellini and reduce heat. Simmer uncovered for 25-35 minutes.
3. Remove bay leaves. Serve with romano cheese sprinkled on top.
Sunday, October 31, 2010
Toasted Pumpkin Seeds

The first step to making toasted pumpkin seeds is to rinse all of the pulp off of the seeds. This is the time-consuming part! Next, you need to let them dry. I like to wrap them in a dish towel and swing the towel around a few times to get most of the water off of them. Then I spread them out on wax paper (I've tried paper towels, but they tend to stick to the paper) and let them dry overnight.
When you are ready to toast the seeds, preheat the oven to 250 degrees. You need to mix the seeds with oil or butter and whatever seasoning you like. I mix the seeds of one pumpkin with 2 tbsp. of olive oil and a teaspoon of garlic salt. Toss in a bowl until all the seeds are coated. Spread them out on a foil-lined baking sheet. Bake for one hour, tossing them every fifteen minutes. They should be golden brown when done.
Cool the seeds before eating. You can store them in an airtight container for 3 months, or refrigerate up to one year. But they probably won't last that long!!
Happy Halloween!!

Monday, October 18, 2010
Lessons from the Garden

As colorful leaves begin to fall from the trees, and the cool autumn temperatures announce the end of the growing season, I've been thinking about what I have learned from my little garden. A garden is a grand teacher, and my little plot has taught me a lot.
I've learned that with a little planning and thought, anyone can grow healthy, organic food. There are many methods of gardening, and the key is to find the method that works in the time and space that you have. Square foot gardening worked great for me. And if I can do it, with my notorious black thumb, anyone can!
Gardens are very forgiving. I made several mistakes along the way, but my vegetables grew in spite of them. Gardens don't demand perfection, only care.

My little garden also taught me that this wonderful place that I live in has a rhythm all its own. Plants will sprout and bloom at the right time - no sooner, no later. The timing in my garden may be different than the timing in someone else's, but it is perfect for this place. I just need to trust and be patient, and the fruits of my labor will come. And isn't that a perfect metaphor for life?
Perhaps the greatest lesson that I have learned during this adventure is the true love of food. When you really love food, you care about where it comes from and how it was grown. You treat it with respect, because you realize what a blessing it is. You savor each bite with a grateful heart. And when we slow down and approach what we eat with care, we then take better care of ourselves - physically and spiritually.

I am already excited about next year's garden. I plan to build one or two more gardening boxes. I am going to try my hand at a larger variety of vegetables and also plant some heirloom tomatoes! This year's garden isn't done yet, though. I'm still enjoying a few vine-ripened tomatoes and green peppers - and keeping a watchful eye on the weather. :) It will be sad when the last of the garden is gone, but that, too, will be a lesson.

Sunday, October 17, 2010
The Last of the Basil
Now that we've had our first light frost, it's time for me to use up the last of my herb garden. My basil did wonderfully late in the season, and most of it survived the frost. Yesterday, I spent the afternoon making pesto with it. I love to eat pesto over pasta, and there are several recipes that call for pesto as well. It can be frozen for up to six months, and freezing it in ice cube trays is a convenient way to store it. You can just grab a couple of pesto cubes at a time.
Traditionally, pesto is made with pinenuts. I've never had much luck finding pinenuts in this area, though. The few times our local grocery store has had them, they were in very small bags, stale and overpriced. I started making my pesto without pinenuts, and later I read that this is how the French make it, calling it "pistou." Pesto is very easy to make. No cooking!
Basil Pesto (without pinenuts)
makes approx. 1 1/4 cups
3 c. fresh basil leaves
3 cloves garlic
3/4 c. grated Parmesan cheese
1 tbsp. lemon juice
1/2 c. extra virgin olive oil
1/2 tsp. salt
1/4 tsp. black pepper
Combine all ingredients in a blender or food processor. Blend until smooth and creamy. Use immediately or freeze.
Friday, October 15, 2010
Green Tomato Salsa
The weather forecast for tonight is possible frost in outlying areas. Oh, my! I still have a lot of tomatoes and bell peppers growing in my garden. I'll have to cover my garden tonight. I've tried a couple of green tomato recipes. The first was for a green tomato breakfast cake. I wasn't very impressed with it. But I have developed a green tomato salsa that I like. You can adjust how hot the salsa is with your choice of chili peppers. Most of the heat is in the seeds, so you can also choose to include the seeds or not.

Green Tomato Salsa
makes approx. 2 cups
2 med. green tomatoes, cored and diced
1 red bell pepper, diced
1/2 med. yellow onion, diced
3 chili peppers, diced
2 garlic cloves, minced
1/2 tsp. salt
1/4 tsp. cumin
2 tsp. olive oil
2 tbsp. water
2 tsp. lime juice
1/2 tsp. sugar
2 tsp. oregano
1. Combine tomatoes, bell pepper, onion, chili peppers, garlic, salt, cumin, olive oil and water in a large sauce pan. Bring to a boil. Cover and cook for 10 minutes.
2. Stir in remaining ingredients and cook for 5 more minutes. Adjust seasoning if desired. Cool completely.
Wednesday, October 13, 2010
Fast "Food" Experiment
Food should be alive, and therefore it should die.- Michael Pollan
Artist Sally Davies' Happy Meal experiment has been getting a lot of media attention lately. But if you haven't seen it, you really should. Davies bought a McDonald's Happy Meal six months ago, and instead of decaying, (as food should!), it only hardened and became like plastic. Draw your own conclusions!!
Daily Mail article about the Happy Meal Project
Tuesday, October 5, 2010
Green Tomatoes
It's hard to believe that October is already here! Things have been so busy around here that September was a blur. The weather has suddenly become very fall-like, and I'm wondering if all the tomatoes growing on my vines are going to have a chance to ripen. Fried green tomatoes are, of course, a classic way to eat those unripe tomatoes, but I have found tons of other recipes on the internet. Salsa, pickles, relish and even cakes! I'm going to try out some of these recipes over the next few weeks. I'll share any good ones that I find. If you know of a good green tomato recipe, please share!!
Monday, September 20, 2010
Chutney Recipe
At this time of year, when apples are in season, I like to make Mango-Apple Chutney. This chutney is fantastic on grilled pork chops! I make a large batch in my slow cooker and preserve the chutney in half-pints.
Mango-Apple Chutney
makes approx. 4 pints
2 c. apple cider vinegar
6 c. apples, skinned, cored and cut in chunks
2 c. mangoes, skinned and cut in chunks
2 c. dark brown sugar
1 c. golden raisins
1 tbsp. kosher salt
2 tsp. cinnamon
2 tsp. ground ginger
2 tsp. ground cloves
2 tsp. mustard seed
1 c. slivered onions
1 tbsp. orange zest
1. Pour vinegar in slow cooker. Cut fruit into vinegar. Mix in remaining ingredients.
2. Cook on high for 2 hours, covered. Lower heat to low and cook for 5 hours, uncovered. Stir occasionally.
3. If preserving, process in a boiling water canner for 15 minutes.
Tuesday, September 7, 2010
Peach Preserves

Fragrant boxes of ripe peaches were everywhere at the farmers market this weekend. I couldn't resist! I decided to try making peach preserves - something I love but have never made before. Looking through recipes, I found that most called for a large amount of sugar. The average amount was 2 cups per pint! I don't like super sweet jams and preserves; I want to taste the fruit. I found a low-sugar recipe and tweaked it to my liking. The result was delicious!
Spiced Peach Preserves
makes about 3 1/2 pints
12 c. fresh peaches, peeled, pitted and sliced
3 c. sugar
2 tbsp. lemon juice
2 tsp. cinnamon
1 tsp. nutmeg
8 oz. liquid fruit pectin
1. In a large pot, combine peaches, sugar, lemon juice, cinnamon and nutmeg. Bring to a full boil, stirring occasionally.
2. Continuing to stir occasionally, boil for 15 minutes and, using large spoon, crush peaches into smaller chunks.
3. Add liquid fruit pectin to boiling mixture.
4. Boil for an additional minute, stirring, until mixture thickens.
5. Remove from heat and put mixture into prepared jars.
6. Preserves can be stored in refrigerator for up to 2 weeks. If canning, follow canning procedures and process in a boiling water canner for 15 minutes. Canned preserves can be stored up to one year.
I would encourage you to try canning. The Ball company makes canning supplies and sells instructional books. They also have a website, which I've listed under Helpful Websites on the right, along with The National Center for Home Food Preservation's website. (Sterilization and proper procedure are important when canning. Follow instructions carefully!)
Monday, August 30, 2010
The Taste of Summer

It was worth the wait. The first ripe tomato from my garden was eaten with much ceremony and gratitude. Nothing tastes of summer like a sun-ripened tomato. Every day, more tomatoes appear, promising a bountiful, if late, harvest. I ate the first plump treasure in a Caprese salad. It made a perfect summer lunch.

Caprese Salad
serves 1
1 tbsp. lemon juice
1 tbsp. extra-virgin olive oil
salt and pepper, to taste
1 large tomato, sliced thinly
3 slices of fresh mozzarella cheese
1 fresh basil leaf, thinly sliced
Whisk lemon juice, olive oil, salt and pepper in a small bowl. Arrange slices of tomato and cheese on a serving plate. Drizzle with lemon juice and olive oil dressing. Sprinkle with basil.
Monday, August 23, 2010
The Egg Recall
The current salmonella outbreak, linked to eggs, highlights the dangers of factory farming. Two egg farms are the source of salmonella infecting several states (13 states at last count.) When you read how many brand names these eggs have been sold under, you understand how food packaging can give the illusion that there are more companies producing our food than actually are. The FDA is warning that the salmonella scare isn't over, and more brands may be recalled. To keep up-to-date on the recall, there are several websites that you can consult, including the two below:
Egg Safety Center
Federal Food Safety Information
In my opinion, this egg recall underlines the importance of finding quality, local sources for our food.
Egg Safety Center
Federal Food Safety Information
In my opinion, this egg recall underlines the importance of finding quality, local sources for our food.
Tuesday, August 10, 2010
Tomatoes!!! (Finally)

Better late than never! My five tomato plants are starting to bear fruit!! I've counted 20 of the little jewels growing and more blooms are coming on. All of this is happening in spite of my overzealous pruning. My parents stopped by one day and tried to hold back their laughter while they explained my mistake. My plants resembled tomato trees instead of the bushy plants they should be. My dad pointed out that a "sucker" is a small branch growing in the V formed by two larger branches. These are the only branches that should be pruned.

Next year I will know better! But all is not lost and soon I will be tasting a homegrown tomato from my own garden!
Friday, July 30, 2010
Putting Up Food
Preserving food at home, or "putting up food," was once a necessity. Now it is considered to be an almost-lost art. My mother has always canned garden veggies, and I remember well the hiss of the canner on the stovetop. (Her canned green beans are fantastic!) There has been a renewed interest in canning and freezing foods in recent years. And with the current concern about the safety of commercially canned products in our grocery stores, I expect more and more people will be interested in how to preserve summer's bounty for the rest of the year.
I recently read an interesting article about community canneries. In some small towns around the country, there are places set aside for community members to preserve their own food. Canning classes are offered, and the equipment is shared and maintained by town citizens. What a neat idea! Here is a link to the story:
Community Canneries
The National Center for Home Food Preservation has a wonderful website, full of information about how to preserve foods. There are instructions on how to can, freeze, dry, cure, smoke and ferment foods. There are also instructions on making jams and jellies. If you are lucky enough to have a garden that is producing more food than you can eat, or if you want to stock up on veggies at your local farmers' market, check out this website. Be sure to follow instructions closely. If foods aren't preserved correctly, they are not safe to eat.
How to Preserve Foods at Home
Monday, July 26, 2010
Eating in Tune with the Seasons
There are no seasons in the American supermarket. Now there are tomatoes all year round, grown halfway around the world, picked when it was green, and ripened with ethylene gas. Although it looks like a tomato, it's kind of a notional tomato. I mean, it's the idea of a tomato.
- Michael Pollan, from Food, Inc.
Today it is hard to imagine that everyone once ate only fresh produce that was in season. There was a time when you couldn't get a fresh tomato in the middle of winter. Many of us don't even know when certain foods are in season, because they are always available to us at the supermarket. But there are many benefits to eating seasonal foods. You can buy them locally, supporting your local economy and reducing the energy needed to ship those foods. When foods are allowed to ripen naturally in the sun, they contain more vital nutrients than their artificially ripened imitators. And they just taste better! Below is a link to Sustainable Table's webpage about seasonal foods. At the bottom of the page, you can enter your state and the season, and a list of seasonal produce for your area will be brought up. It's a great tool to re-teach us how to eat in tune with the seasons.
New Blog Feature
Blogger now has a new feature for blog posts. At the end of each posting, there are squares you can click on to share that posting with others. There are options to e-mail the posting, share it on your own blog, on Facebook, etc. If you know of someone who may be interested in one of my postings, but doesn't follow my blog, please feel free to use this new feature! Thanks!
Tuesday, July 20, 2010
Waste Not, Want Not
Many of us end up throwing out much of the fruits and veggies that we buy. There are a few tricks to making your produce last longer, and not waste all of that food. Vegetarian Times has a nice article about what to store in the fridge, what foods should be stored together or separated, and other tricks for keeping your fruits and vegetables in their best shape!
Produce Storage Guide
Produce Storage Guide
Sunday, July 18, 2010
First Tomato!!

My first tomato is growing!! It's a Roma tomato on the plant I thought wouldn't make it. It's exciting to see a tomato growing on a plant I started from seed.
Thursday, July 15, 2010
Dreaming of Blackberries

Tuesday, July 13, 2010
Garden Update
My garden is doing well! More peppers have come on and are growing! I have had a handful of sugar snap peas. I'm going to try planting them again this fall, when the weather is cooler. I'm hoping I'll get more peas to grow then. The onions and lettuce are doing quite well. I've learned that if I cut off the lettuce heads at the stem, the stem will begin to grow more lettuce leaves. Every time I pick a green onion, I just plant another onion bulb in its place.
The tomatoes are more of a mystery to me. The plants have grown to be about 4 feet high and are putting on plenty of blooms. I still haven't seen an actual tomato, though. My mother explained to me that the plants that are started from seed at home will take longer to produce tomatoes than the plants bought from the store. I hope that's all it is and I'll see tomatoes soon! There is a process known as "suckering" and I'm wondering if I'm getting it right. Tomato plants need to be pruned so that you end up with one main vine. Large branches growing from the main vine, called "suckers," need to be cut so that all the nutrients can feed the main vine and grow fruit. I'm afraid of overpruning, but I don't know if I'm pruning enough. I am excited to see that the Roma tomato plant that I started from seed is growing well and putting on blooms, too. I didn't know if it would survive. One of the many things that gardens teach us is patience. It can be a hard lesson! :)
The tomatoes are more of a mystery to me. The plants have grown to be about 4 feet high and are putting on plenty of blooms. I still haven't seen an actual tomato, though. My mother explained to me that the plants that are started from seed at home will take longer to produce tomatoes than the plants bought from the store. I hope that's all it is and I'll see tomatoes soon! There is a process known as "suckering" and I'm wondering if I'm getting it right. Tomato plants need to be pruned so that you end up with one main vine. Large branches growing from the main vine, called "suckers," need to be cut so that all the nutrients can feed the main vine and grow fruit. I'm afraid of overpruning, but I don't know if I'm pruning enough. I am excited to see that the Roma tomato plant that I started from seed is growing well and putting on blooms, too. I didn't know if it would survive. One of the many things that gardens teach us is patience. It can be a hard lesson! :)
Tuesday, July 6, 2010
It's Greek to Me
Mediterranean meals are perfect for sultry summer days. I recently made my first Greek-inspired dinner and it was fantastic! I purchased lamb from the farmers' market and made marinated kebabs. To accompany the kebabs, I made tzatziki, a tangy, refreshing Greek dip. I grilled pita bread slathered in olive oil to dip in the tzatziki. Eaten outside in the cooling evening air, this meal was fun and delicious!
The recipes I used are Ina Garten's. She hosts The Barefoot Contessa on Food Network. The links are below.
Marinated Lamb Kebabs
Easy Tzatziki with Toasted Pita Crisps
The recipes I used are Ina Garten's. She hosts The Barefoot Contessa on Food Network. The links are below.
Marinated Lamb Kebabs
Easy Tzatziki with Toasted Pita Crisps
Tuesday, June 29, 2010
Baby Bell Pepper

I was so excited when I found this little pepper yesterday! My daughter said, "Oh! It's so cute!"
I have also been harvesting some romaine lettuce and a few green onions. Very tasty! The blooms on my tomato plants are promising. My sugar snap peas don't look well, so we'll have to see how they turn out. They started out great, but whatever has been eating them seems to like the taste of insecticidal soap! Everything else is doing great.
Saturday, June 19, 2010
Fish Tacos with Cilantro-Lime Dressing
Sultry summer days call for light and refreshing meals. I recently made fish tacos for the first time and my family loves them! They are nutritious, flavorful and light enough for hot summer evenings.
Fish Tacos with Cilantro-Lime Dressing
Marinade for Fish:
1/4 c. olive oil
2 tbsp. white wine vinegar
2 tbsp. lime juice
1 1/2 tsp. honey
2 cloves garlic, minced
1/2 tsp. cumin
1/2 tsp. chili powder
1 tsp. seafood seasoning (Old Bay, for example)
1/2 tsp. ground black pepper
1 tsp. hot pepper sauce (Tabasco, for example)
Cilantro-Lime Dressing:
1 c. mayonnaise
2 tbsp. lime juice
1 tbsp. fresh cilantro, chopped
1/4 tsp. cumin
1/4 tsp. chili powder
1/4 tsp. ground black pepper
Other Ingredients:
1 pound fish fillets, cut into chunks (tilapia is suggested)
6 flour tortilla wraps
3 tomatoes, diced
1 head of lettuce, shredded
2 green onions, chopped
1. Whisk together marinade ingredients in a bowl until well blended. Place fish in a gallon size plastic bag and pour marinade over fish. Seal bag, making sure to seal out any extra air. Gently massage marinade into fish and then refrigerate for several hours. (At least 6 hours is suggested.)
2. Stir together dressing ingredients until well blended. Refrigerate until needed.
3. Remove fish from marinade, letting excess marinade drain off fish. Discard the marinade. Cook fish with desired method. You can grill the fish, bake it or fry it in a small amount of oil. Cook until fish is easily flaked with a fork. Don't overcook!
4. Assemble your tacos. Place fish in the center of each tortilla wrap. Add lettuce, tomatoes, green onions and any other toppings you may like. Drizzle with cilantro-lime dressing. Fold and enjoy!!
Wednesday, June 16, 2010


Monday, June 14, 2010
Busy Summer

Now that my daughter is on summer vacation, it seems I have no time to get anything done! I'm really glad I decided to try square-foot gardening. So far, I have had to spend very little time tending my garden. Just a little bit of weeding and fertilizing. My tomatoes and peppers have really taken off. My peas have put on some blooms. I can't wait to taste those veggies!
Tuesday, June 1, 2010
Organic Pest Control
Something has been eating my peas and basil!! Since I'm committed to organic gardening, my options for controlling insects are limited. The organic movement is growing, though, and insecticide producers are meeting the demand. There are several eco-friendly products on the market today, but you do need to read labels carefully. I ran across several that sounded like they were organic, but the fine print warned that they were not. Earth Options by Raid is one line of products made for organic production. I am using the insecticidal soap.
Using soap suds is an old method of controlling insects, but most of today's soap contains chemicals that you don't want on your food. The insecticidal soap I am using does seem to be working, but you need to be diligent and apply it after every rain. If you know of any other organic methods of pest control, please share!!
Using soap suds is an old method of controlling insects, but most of today's soap contains chemicals that you don't want on your food. The insecticidal soap I am using does seem to be working, but you need to be diligent and apply it after every rain. If you know of any other organic methods of pest control, please share!!
Wednesday, May 26, 2010
Food for Thought
I just finished reading an article in the February/March 2007 issue of Mother Earth News, entitled "Why Grow Your Own Food?" The article was written by Harvey Ussery, a 21st century homesteader. I just wanted to share this passage from the article:
Surely there has been no society in human history more estranged from the natural world than ours, and we experience that broken relationship in what we eat and the way we eat it: artificial foods bearing little relation to their origin in soil or in living plants and animals; eaten thoughtlessly, on the run.
Modern eating is above all about forgetting - about what it is we are eating, about its origins in living systems. The alternative is to learn to know our food intimately, to care intensely about its quality and its role in our lives, to share it with gratitude and respect.
Whenever we grow our own food, or seek it from local sources, we reconnect with the natural year, the passing of the seasons, the interdependence of all forms of life in the great web. By participating in the creation of our food, from soil to table, we find our way back to food as a sacred gift.
Monday, May 17, 2010
Composting
"Buy worms, fight global warming!" At the Athens Farmers' Market this past Saturday, I heard this being shouted into the crowd. One of the vendors was selling worms for compost bins - and having a lot of fun doing it. "Grow worms, not war!" Though this man was presenting the subject with humor, composting is, seriously, a great way to help the environment. Instead of sending much of your waste to the landfill, you can turn it into rich compost for your garden.
Composting is a simple biological process. Microorganisms, fungi, bacteria, and worms digest organic matter, such as leaves, grass and vegetable scraps. The result is compost or humus, a nutrient-rich soil.
There are two types of compost bins - open-sided and enclosed. You can buy them or make your own. My compost bins were wooden boxes that my husband brought home from work. The enclosed bins break down matter more quickly, because they hold in heat and moisture better, but open-sided bins work great, too.
To create a compost pile that generates a lot of heat, you should mix one part "green" materials with three parts "brown" materials. Green materials include grass clippings, garden prunings, green weeds and leaves, eggshells, and fruit and vegetable scraps. Brown materials include straw, sawdust, shredded paper and dry leaves. Do not use meat or sugary foods in your compost. You want to layer the materials, alternating green and brown. Gently water the pile as it grows, keeping it moist, but not soggy. Regularly turn the compost to aerate the materials. Heat, moisture and air will speed up the composting process.
Worms help speed up the decomposition process, too. You can do what I do, which is look for worms after a rainy day, or you can buy them at bait stores or places like the Athens Farmers' Market. If you have a garden or flower beds, consider starting a compost pile. It will create fantastic soil for your plants, and reduce the amount of materials you are sending to the landfill. Go worms!!
Wednesday, May 12, 2010
A Perfect Day for Planting
This morning I transplanted my tomato and pepper seedlings. It's a nice, damp day - perfect for planting. My mom gave me some tomato plants - mine were starting to look a little sad. I did plant one of them, a Roma tomato, just to see how it will do. My bell pepper seedlings didn't look too bad. After nuturing my little plants, I felt a little like a mother bird, pushing her chicks out of the nest. I hope they do well.
It's nice to see all the squares in my garden holding veggies now. The pea and lettuce seeds I planted are doing great. The sugar snap peas are getting big enough that I'll need to find some sort of small trellis for them to climb. The Romaine lettuce looks like miniature heads of lettuce. I just hope the rabbits don't find them!

Last year, I started a small herb garden by my back step. The thyme I planted is still doing well, and today I planted rosemary, cilantro, and basil. Fresh herbs are a great way to add some zing to your cooking. You can save a lot of money by planting your own.
 Well, spring has sprung. The hummingbirds are back from their travels south, and are busy emptying our feeder. My rhododendren is blooming, adding some beautiful color to the yard. My crops are planted, and now all I can do is to continue to nurture them and cross my fingers! :)
Wednesday, May 5, 2010
Jamaican Jerk Marinade
One of my favorite ways to serve pork is in the Jamaican jerk style. It's the perfect blend of savory and sweet, spicy and citrusy. There are many Jamaican jerk marinades on the market, but they almost all contain high fructose corn syrup and other additives. For a more authentic taste without all the chemicals, I use the recipe below. I like to marinate thick cut pork chops from the farmers' market for several hours, and then grill them on charcoal. You could also use this marinade on poultry and even fish. It can marinate up to 1 1/2 pounds of meat.
Jamaican Jerk Marinade
1/2 cup orange juice
1/2 cup red wine vinegar
1/4 cup soy sauce
1/4 cup extra-virgin olive oil
1 jalapeno pepper, diced (more if you like it extra hot!)
1 tbsp. brown sugar
1 tsp. kosher salt
1 tsp. thyme
1 tsp. cinnamon
1/2 tsp. nutmeg
1 tbsp. allspice
1 1/2 tsp. ginger
4 cloves of garlic, minced
4 green onions, thinly sliced (white and green parts)
Mix all ingredients. Reserve a small amount to use as a sauce if you like (before you place the meat in.) Place meat and marinade in a gallon size plastic bag. Massage the marinade into the meat and let sit in the refrigerator for a few hours. (The longer the meat marinades, the more flavorful it will be.) Remove the meat and cook with your preferred method.
Wednesday, April 28, 2010
Organic Fertilizer
Fertilizing a garden is a must to produce strong, healthy plants. There are many commercial organic fertilizers on the market, but you can also mix your own fertilizer for less money. My mom and one of her good friends get together every year to mix a potent organic fertilizer for their gardens. My mom swears by it! And she has given me a bag of it to try on my new organic garden. (Thanks, Mom!!!) The recipe for this fertilizer was published in Mother Earth News in 2006. Below is a link to the article and recipe. It's very potent, and you have to be careful not to use too much, or it can burn up your plants. I'll be sprinkling a small amount into the soil, once a month. You may want to try it, too.
A Better Way to Fertilize Your Garden - Mother Earth News article
A Better Way to Fertilize Your Garden - Mother Earth News article
Friday, April 23, 2010
The Real Cost of Food
When I talk to people about the different food choices I am making now, they almost always ask me about the cost of natural and organic foods. In these tough economic times, it's a legitimate question. We all need to cut costs where we can. However, the answer to this question isn't as simple as you might think.
The prices at the farmers' market are a little higher than at the supermarket. A dozen eggs will run $3 a dozen at the farmers' market and $1.24 at the supermarket. But the farmers' market eggs are natural and organic. A pound of ground beef will cost $3.75 a pound at the farmers' market, and $2.68 a pound at the supermarket. But the farmers' market beef is Angus, grass-fed beef, and given no hormones. When you look for the same quality products at the supermarket, you won't see much of a price difference. The organic cheese I've been buying at the farmers' market is actually less expensive than quality cheese at the grocery store. But the price tag doesn't tell the whole story.
We've been hearing a lot about the health care crisis in the news lately. I believe America is really experiencing a health crisis. Health care is such an issue because we are so unhealthy as a nation. And most of the diseases and disorders that are rapidly appearing are directly related to the food that we eat. There is an old saying that "you can pay the grocer now, or pay the doctor later." Americans seem to be opting to pay the doctor. In 1960, Americans spent 18% of their income on food and 5% on health care. Today we spend 9% of our income on food and 17% on health care. How many E. coli and salmonella outbreaks have we had in recent years? Those outbreaks are directly linked to our food supply and are caused by industrial food production practices.
And then there are the government subsidies that support the way food is produced in this country. Our government heavily subsidizes the production of corn. Corn is fed to the livestock on the factory farms (whether or not the animals are actually designed to eat corn.) Corn is the source of many additives to our food, including high fructose corn syrup, maltodextrin and xanthan gum. Take a the look at the ingredients label of most junk food and you will see corn, in one form or another. And where does the money come from for these subsidies? We, the people, of course. The taxpayers. So, when you look at your supermarket receipt, it doesn't tell you the entire out-of-pocket cost for your food. You need to add the percentage of your taxes that paid for that food.
The environmental costs of industrial food production are high. Toxic runoff from factory farms poison water supplies and the earth. Pesticides are killing and mutating wildlife. The cost of shipping food to the factory farms for the livestock, and shipping food across the country and, in some cases, across the world, are astronomical. It leaves a huge carbon footprint. We can't forget that our health is directly related to the planet's health.
Joel Salatin is the owner and operator of Polyface Farms in Virginia. He is an author, lecturer and advocate for natural and sustainable farming practices. He is also working for transparency and accountability in our nation's food production system. In the documentary Food, Inc., Salatin put it best when he said:
Is cheapness everything that there is? Who wants to buy the cheapest car? We're willing to subsidize the food system to create the 'mystique' of cheap food, when actually it's very expensive food, when you add up the environmental costs, societal costs, health costs. The industrial food is not honest food. It's not priced honestly. It's not produced honestly. It's not processed honestly. There's nothing honest about that food.In the end, I've come to the conclusion that eating natural, locally-produced food, costs less than commercially-produced food. My family is healthier for it, my environment is healthier, and I'm supporting my local economy.
Tuesday, April 20, 2010
Food, Inc. on PBS
This Wednesday, April 21, PBS will air Food, Inc. at 9 p.m. This documentary explains how much of this country's food is produced, information that we all should have. Tune in or set your DVR!
Monday, April 19, 2010
You win some, you lose some...
My sugar snap pea seedlings have passed on. :( I think that, like the lettuce, I shouldn't have tried to sprout them indoors. I've planted seeds in their place and I'm hoping to have better results! The good news is my onions are sprouting! And today I saw the first tiny little lettuce leaf appearing in my garden. Trial and error.
My tomato and pepper seedlings still seem to be doing well. I've found 9 more mushrooms since my last posting. The mushrooms get larger as the season progresses. We enjoyed the last batch with grilled steak this weekend. A delicious slow food meal!
My tomato and pepper seedlings still seem to be doing well. I've found 9 more mushrooms since my last posting. The mushrooms get larger as the season progresses. We enjoyed the last batch with grilled steak this weekend. A delicious slow food meal!
Thursday, April 15, 2010
It's Mushroom Season!
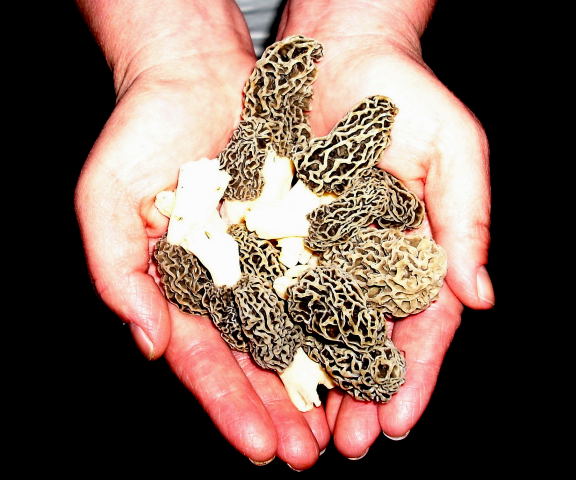
It's morel mushroom season! For a few weeks every spring, these little gifts grow in the woods. I'm lucky enough to have a small mushroom patch on my property. Morels are rare and many mushroom hunters keep their hunting grounds secret. Morels, like many wild mushrooms, cannot be cultivated. Though there are many theories amongst seasoned mushroom hunters, no one understands exactly how the spores are spread, or where exactly they come from. They only grow where the soil, moisture and temperature are perfect.
These picky little morsels taste fantastic. They have an earthy, nutty flavor. Morels can be dehydrated or frozen, but taste best when they are fresh. My little patch doesn't produce many mushrooms, so we just enjoy them while they are in season. Last night I found my first morels of the season. Thirteen little mushrooms were sticking their heads up through the thick leaves. They can be hard to spot and many people have a hard time distinguishing them from the leaves and plants on the ground. I enjoy hunting them; it gives me time alone in the woods and is great "mental floss."
Morels can be put in soups or sauces. A lot of people like to batter and deep fry them, but I think that destroys their great taste. My family's favorite way to prepare them is to lightly saute' them in olive oil and garlic. They are a healthy, tasty treat!!

Tuesday, April 13, 2010
My Square Foot Garden
My 4' x 4' garden box has been assembled!


I placed the garden bed on the south side of our house to get as much sunlight as possible. I also put it right up against the house, in hopes of discouraging deer from dining on my vegetables. The box is made of 1x6 boards, and 1/2x2 boards form the grid. Instead of using topsoil, I mixed together "Mel's Mix," which is suggested in Square Foot Gardening. It's 1/3 peat moss, 1/3 compost and 1/3 vermiculite. This mix is supposed to hold moisture well, without compacting. Vermiculite can be difficult to find, and I had to buy several small bags at Lowes. If anyone knows of a place to buy it in larger bags, let me know!
I planted my cool weather veggies in the new gardening box. I transplanted my sugar snap peas. My lettuce seedlings all died, so I planted more seeds directly in the box, hoping they will grow. I also planted my red onion bulbs. The tomato and pepper seedlings will need to wait for another month or so. Each square in the box is a square foot. Tomato and pepper plants can only be planted one per square. However, peas and lettuce can be planted 4 per square, and the onions 8 per square. The square foot method is supposed to use less space than the traditional method of planting in rows. And because you never walk directly on the soil, you also spend less time working the soil.
I discovered this weekend that our apple tree is blooming. I planted this tree as a seedling and this is the first year that it has put on blooms. It will be interesting to see if it produces anything resembling an apple this year!

Monday, April 12, 2010
Grass-Fed vs. Corn-Fed Beef
This is an interesting story about the health benefits of grass-fed beef. The writer seemed to prefer the taste of corn-fed beef, but found evidence that grass-fed is healthier. My family prefers the taste of grass-fed. It's all a matter of taste!
http://www.npr.org/templates/story/story.php?storyID=125722082&sc=fb&cc=fp
http://www.npr.org/templates/story/story.php?storyID=125722082&sc=fb&cc=fp
Tuesday, April 6, 2010
Chicken
I have a love/hate relationship with chicken. My husband still tells the story about the first time we went to the county fair together. After walking through the chicken barn, I couldn't eat chicken for 6 months. They are not the cleanest of animals. Seeing all of those birds stuffed into little cages, pooing everywhere, and smelling not so nicely, turned my stomach. But let's face it, there are some delicious chicken dishes, and after the memory of the county fair faded, I went back to eating poultry. White chicken meat is also touted as being one of the healthiest meats - another reason for me to push the image of the chicken barn out of my mind.
However, a few months ago, when I began researching how our food is produced in this country, I vowed never to buy or eat commercial chicken again. Factory farms, where most chickens in the U.S. are bred and grown, are filthy. The air is so full of toxins that the humans working there have to wear masks. The chickens, however, breathe in all of the dirty air. Some chickens are kept in cages so small that they cannot move. Some chickens are kept on feedlot floors, so crowded that they also have trouble moving. They literally live in filth. Commercially produced chickens have also been genetically modified to grow faster and produce more breast meat. Their bodies grow so fast that their legs cannot keep up, and many are not capable of walking. I cannot believe that the meat from these animals could possibly be healthy.
There are farmers who still raise chickens naturally, and I found one at the farmers' market this past weekend. He had photos of his farm, showing that his chickens are healthy and clean. They spend most of the day outside in the sun and fresh air. They eat a natural diet. I bought a whole chicken and brought it home to grill. The meat was leaner than what I have found in the supermarket. Even the skin looked less fatty. The body was proportioned differently, with smaller breasts. And it tasted great! I felt much better about serving this kind of meat to my family.
One of my favorite ways to cook chicken is on the grill, using a beer can stand. You can buy these stands where they sell grill accessories. It's a small metal stand that you slide a beer can into. You slide the chicken over the top of the stand, and as the beer heats, it steams the inside of the bird. It keeps the meat moist and permeates it with flavor. I also use a Tuscan herb rub on the outside of the chicken. It is so good!
Tuscan Herb Rub
4 1/2 tsp. garlic salt
1 1/2 tsp. onion powder
1 1/2 tsp. ground black pepper
1 1/2 tsp. dried basil
3/4 tsp. ground thyme
Combine all ingredients, mixing well. Rub or pat on chicken, pork or lamb just before cooking.
Saturday, April 3, 2010
My seeds are sprouting!

My seeds are sprouting! The sugar snap peas have gone crazy! And the tomatoes and peppers are just beginning to sprout. I'm off to get some larger peat pots for the peas. If I can just keep them alive until I plant them outside! :) I'm also going to get some more supplies for building my square foot gardening planting box. I've posted Mel Bartholomew's website on the right, if you would like to learn more about square foot gardening.
Monday, March 29, 2010
Childhood Obesity and School Lunches
If you live anywhere near a television, you have heard about the obesity epidemic in the U.S. Two out of three adults in this country are overweight. One out of three children are. And most overweight children will grow up to be overweight adults. Excess weight leads to many health problems, including diabetes, heart disease, and increased rates of cancer. Nothing is more important than our children, and we need to do everything we can to insure their future. This means feeding them healthy, whole foods.
School lunches tend to be full of fat and processed foods. Some schools are improving their menus. My daughter's school cafeteria has a fresh fruit and veggie bar and serves vegetables with every entree. But the entrees themselves are usually fried and/or processed foods, full of fat and calories, and offering little in nutrition. Popcorn chicken, corndogs and pizza. I usually pack my daughter a lunch, but many families, including low-income households, depend on school lunches.
Jamie Oliver, a TV chef, has started a campaign to improve the nutrition in our schools' lunches. He has a TV show, which I have not seen, in which he visits a school district in West Virginia, and works with the cafeterias to improve the quality of the food they serve. He also has started a petition, that he plans to present to President Obama, asking the White House to address this issue. You can visit Jamie Oliver's website, and learn more about this campaign, at the link below. You can also sign the petition. Our children deserve the best.
http://www.jamieoliver.com/campaigns/jamies-food-revolution

Comments welcome from non-followers
Thanks to a suggestion made by my friend, Merry, I figured out how to open up comments to all readers. You do not have to be registered as a follower of this blog to leave a comment. Thanks, Merry!! :)
Friday, March 26, 2010
Slow Bread
Do you know what is in the bread that you buy? Here is an ingredient list from a commercial white bread: enriched wheat flour (wheat flour, niacin, iron, thiamine mononitrate, riboflavin, folic acid), water, high fructose corn syrup, potato flour, soybean oil, yeast, wheat gluten, calcium sulfate, sodium chloride, ammonium chloride, sodium stearoyl lactylate, mono and diglycerides, ascorbic acid, azodicarbonamide, calcium propionate, turmeric, paprika. Yummy, huh? It sounds like a science experiment to me.
The basic recipe for bread contains flour, yeast, salt and water. That's it. Chemicals are not necessary to produce a loaf of bread. And if you've been lucky enough to taste homemade bread, made without the chemicals, you will know that chemicals do not even make a tasty bread. I am lucky enough to have a mother who bakes bread. When I was a child, our home was often filled with the aroma of bread baking in the oven. To this day, it is one of my favorite smells. And homemade bread is one of my favorite foods.
Over the years, I learned to make bread myself. (Maybe not as good as Mom, but I don't do too bad!) Many people are intimidated by the thought of baking their own bread, but it really is a simple process. It just takes time. I have heard some people say they don't want to do all the work of kneading the bread. I enjoy kneading bread, though. I think it is a great stress reliever. But there is a way of making homemade bread without kneading, and without resorting to a bread maker.
No-knead breads have been around for as long as bread has. Kneading quickens the process of gluten molecules binding together. But slow rising will achieve this as well, and will enhance the flavor and texture of the bread. Slow rising may also fit into busy schedules a little better. Recently, I tried a no-knead recipe for the first time, and it was absolutely the best loaf of bread I have ever made. The crust was crunchy and the interior was light and airy. The taste was fantastic. And it was so easy. Below is my adaptation of a no-knead bread recipe that ran in the New York Times in 2006. It will produce one round loaf of bread. Try it!
No-Knead Bread
Time required: 1 1/2 hours, plus 14 to 20 hours for rising
Equipment needed:
1 large mixing bowl
1 6- to 8-quart heavy pot, with lid (cast iron, enamelware, glass or ceramic - no aluminum or steel)
2 cotton kitchen towels (no terry towels)
1 kitchen thermometer
1 spatula
measuring spoons
measuring cups
cooling rack
plastic wrap
Ingredients:
3 cups all-purpose flour, plus more for dusting
1/4 tsp. instant yeast
1 1/4 tsp. salt
1 5/8 cups warm water (110 to 115 degrees)
2 Tbsp. olive oil (optional)
1. In a large mixing bowl, combine the flour, yeast and salt. Add the warm water and stir until blended. The dough will be very wet and sticky. Cover the bowl with plastic wrap and let dough rest for at least 12 hours (18 hours is even better), at room temperature, about 70 degrees.
2. Dough will be dotted with bubbles when it is ready. Lightly flour a work surface, and using a spatula, pour dough onto it. Sprinkle the dough with a little flour, and using the spatula, fold it over onto itself. Cover loosely with plastic wrap and let rest for 15 minutes.
3. Coat a cotton towel with flour. With floured fingers, shape the dough into a ball. (It is very sticky and wet, so just do the best you can.) Place the ball of dough on the floured towel. Dust with more flour and cover with a second cotton towel. Let rise for about 2 hours. Dough should double in size.
4. About 30 minutes before the dough is ready, preheat oven to 450 degrees. Put your 6- to 8-quart lidded pot in the oven as it heats. It's important that the pot be heated when you put the dough in it. When the dough is done rising, carefully remove the pot from the oven. If you like olive oil, drizzle 2 tablespoons in the bottom of the pot. This isn't necessary, though. (I just like the taste!) Slide your hand under the towel and turn the dough over into the pot. Shake the pot a little if dough is not evenly distributed. It looks like a big ol' mess, but that's OK. Cover with lid, and bake for 30 minutes. Remove lid and bake for another 15 minutes, or until golden brown. Carefully dump the bread out of the pot and cool on a cooling rack.
Monday, March 22, 2010
Planting the seeds...
A garden is a grand teacher. It teaches patience and careful watchfulness; it teaches industry and thrift; above all it teaches entire trust. - Gertrude Jekyll
Perhaps the best way to feel connected to your food is to grow it for yourself. There can be no replacement for the experience of nurturing a food from seed to plant to your table. I am excited to begin plans for my first organic vegetable garden. I am also very lucky to have a mother and a sister-in-law, who are both avid organic gardeners. Their advice will become invaluable to me! I have not inherited my mother's green thumb.
My property is beautiful, wooded hillside, and I love living here. However, it's not exactly prime gardening material. We have very little yard, and the soil is hard clay. When I decided to try my hand at growing food, I had to find a system that would work in very little space and poor soil. I've been reading Square Foot Gardening by Mel Bartholomew, and I've decided to try this method. I'm starting small this first year - a 4 foot by 4 foot plot. Following the square foot gardening method, though, this should produce a nice amount of vegetables.
As I go through the steps of beginning my garden, I will keep my readers updated on my progress (or lack of it.) I also hope to add photos along the way.
The first step in my garden adventure is to start my seeds. On my mother's advice, I bought a small plastic greenhouse designed for sprouting seeds. I had a lot of fun looking through all the seed packets at the store and picking out the vegetables to grow. The colorful seed packets contain the potential for so much good food! Keeping my picky 6-year-old in mind, I bought seeds for the vegetables that my family eats the most - tomatoes, sweet peppers, lettuce, and sugar snap peas. I also couldn't resist buying bulbs for red onions. I've planted my seeds in the little peat pods that came with the greenhouse. Now I just need to let the seeds of this garden teach me "patience and careful watchfulness." And trust.
Sunday, March 14, 2010
The Farmers' Market - Part 2
Yesterday, I returned to the Athens Farmers' Market. This time I was prepared! Even though it was raining, there was a crowd there, buying all of that wonderful food. There is something to be said about being able to meet the person producing your food, to be able to look them in the eye. And when you hear them describe with pride how they operate their farm, you feel very good about buying their product.
I bought some grass-fed Angus T-bone steaks, that we grilled last night for dinner. My husband took one bite and said, "This tastes like my childhood." Grass-fed beef tastes completely different than corn-fed. There was a time when most cattle was fed grass instead of corn. I prepared the steaks in the Florentine style: rub both sides of the steak with a cut clove of garlic and salt and pepper. Grill to your liking. While the meat rests, drizzle a small amount of lemon juice and olive oil on it. It may sound strange, but it tastes fantastic. I paired the steaks with a Syrah from Raven's Glenn, a winery in West Lafayette, Ohio. It was very good.
I'm a cheese freak, and I bought some delicious cheese at the market. It was made by Laurel Valley Creamery, in Gallipolis, Ohio. A creamy Farmsteader cheese and Cincinnati Chili spiced cheese curds. So good!
My daughter enjoyed the Farmers' Market as much as I did. As we left, she said, "I hope we can come here every Saturday." I hope we can, too!
Thursday, March 11, 2010
Defending the Free Market of Food
Currently, there is legislation being proposed that would give the FDA more power to regulate small farms. It is called S.510, the "Food Safety Modernization Act." The link below will explain the proposed law, and why it could endanger our choice to eat locally-grown, naturally-produced food.
Defending the Free Market of Food
Defending the Free Market of Food
Wednesday, March 10, 2010
Spring is coming!!
As we count down the final days of winter, the weather has been beautiful! The sun is out and the temperature has climbed into the 60's for the past few days. My mind has turned to the garden I want to start this year. It will be my first venture into organic gardening. I also find myself wanting to just sit and enjoy the sun, which we haven't seen in so long. I hope you all have the chance to find a quiet moment to slow down and sit in the sun with a nice drink. If you like cocktails, here is a recipe to try:
Spring Fling
2 parts coconut-flavored rum
1 part orange liqueur (such as Triple Sec)
1 part cranberry juice
1 part pineapple juice
Combine all ingredients in an ice-filled cocktail shaker. Shake well and strain into a cocktail glass. Garnish if you like. Enjoy!
Spring Fling
2 parts coconut-flavored rum
1 part orange liqueur (such as Triple Sec)
1 part cranberry juice
1 part pineapple juice
Combine all ingredients in an ice-filled cocktail shaker. Shake well and strain into a cocktail glass. Garnish if you like. Enjoy!
Comments welcome!
I look forward to getting some comments. We writers need feedback, and I'd love to hear about the thoughts and experiences of others. If you are new to Blogger, you may not know how to post a comment. Here's a few tips: First, you must be logged in as a follower of this blog to leave a comment. This is a security measure that Blogger uses. Once you are logged in, you can go to the bottom of the post that you want to comment on. Click on the underlined "0 Comments" (or whatever number of comments there are.) A window pops up for you to type your comment in. Type in your comment and click the "Post Comment" button. Then, you will have to type in the security words that appear, as a second security measure. If you don't type in the security words, the post won't appear on the blog. Let me know what you think! Thanks!
Sunday, March 7, 2010
The Farmers' Market
A great resource for locally-grown, naturally-raised food is your local farmers' market. Many cities and towns have begun promoting this old idea. The farmers' market in my town only meets during the summer months, and so far, is rather small. I hope to see it grow. Only 30 minutes from our town, though, is Athens, Ohio, which hosts a farmers' market year-round. Audobon Magazine said that The Athens Farmers' Market was "one of the nation's best markets." I finally got to visit it yesterday.
Since it is still winter, I didn't expect to find a lot at the market. I came ill-prepared, without a cooler or shopping bag. That was a mistake. There were producers of naturally-raised, grass-fed meats. Farmers who made their own organic cheeses. Organic eggs, breads and sweets. We did buy some salsa, which was out of this world! And I can't wait to try the maple syrup we found. There was even some produce - winter squashes, apples, greens. One vendor told us to be sure to come back in April, when things really take off.
The atmosphere of this market was great. Everyone seemed happy. There was quite a diversified crowd there - hippy throw-backs, farmers in overalls, well-heeled couples, and people from every corner of the planet. All of this great food brought everyone together. I loved that.
I will definitely be visiting this market next weekend, with a large cooler, a lot of shopping bags, and my family to help me carry our new-found treasures. I would encourage you to find a farmers' market in your area. You'll probably find yourself visiting it often!
What is Slow Food?
In 1986, the fast food chain, McDonald's, announced plans to open a restaurant near the Spanish Steps of Rome. Italian citizens were outraged. Food is an integral part of the Italian culture. In Italy, food is to be prepared with care and shared with friends and family. It is to be lingered over and savored. Nothing could be less Italian than McDonald's. In response to the giant of fast food, the beginnings of the Slow Food movement began. This organization has grown to be an international group, with national and local chapters all over the world. Its mission is to preserve local food traditions and educate people about the consequences of fast food and fast living. I've posted a link to both the international and American Slow Food organizations on the right side of this blog.
To me, slow food is a state of mind. It's about slowing down enough to sit down and eat dinner with my family. It's planning a made-from-scratch meal, finding quality ingredients and cooking it with care and love. While the slow food attitude is easy to maintain in Italian culture, it can be challenging in our fast-paced American culture. We move at such a quick rate and have such hectic schedules, it can be hard to get everyone in the house at one time. In families where both parents work outside the home, finding the time to prepare a home-cooked meal can seem impossible. I think it's worth making the time, though. It may mean rearranging schedules and re-prioritizing activities. For those who never sit down together at the dining room table to share a meal, just setting aside one day may make a big difference. Get everyone involved in preparing the meal, sit down and talk to each other. Reconnect. The Italians have a wonderful proverb: A tavola non s'invecchi mai. You never grow old at the table.
To me, slow food is a state of mind. It's about slowing down enough to sit down and eat dinner with my family. It's planning a made-from-scratch meal, finding quality ingredients and cooking it with care and love. While the slow food attitude is easy to maintain in Italian culture, it can be challenging in our fast-paced American culture. We move at such a quick rate and have such hectic schedules, it can be hard to get everyone in the house at one time. In families where both parents work outside the home, finding the time to prepare a home-cooked meal can seem impossible. I think it's worth making the time, though. It may mean rearranging schedules and re-prioritizing activities. For those who never sit down together at the dining room table to share a meal, just setting aside one day may make a big difference. Get everyone involved in preparing the meal, sit down and talk to each other. Reconnect. The Italians have a wonderful proverb: A tavola non s'invecchi mai. You never grow old at the table.
Friday, March 5, 2010
The journey begins...
I love food. I love planning meals, shopping for just the right ingredients, and creating magic in the kitchen. And I especially love eating food. Recently, though, I became aware of just how disconnected I am from my food. I go to the grocery store and put items in my cart without ever thinking of where that food came from. Where and how was that tomato grown? What did the cow, whose steaks I'm about to grill, eat himself and how did he live? What is xanthan gum, and why is it in my mayonnaise? Does it matter? If we are what we eat, and what we eat eats, then it does matter.
As I began to research how most food is produced in the USA, I was astounded. This is what I've been eating? This is what my child has been eating? Government agencies and corporations may tell us that it's safe and healthy, but should we entrust our well-being to them? Something had to change.
This blog is a journal about my journey to reconnect with what nourishes our bodies, and I believe, what can also nourish our souls. What and how we eat affects our health. Most people understand that. But it also affects us environmentally, socially and spiritually. I plan to share personal insights, recipes and my journey to finding natural, sustainable, delicious food for my family. I invite all who are interested to become official "followers" and share their own thoughts and experiences. My hope is that I can, at least, spark some interest in others to think about what they are eating and what it means to them. Buon appetito!!
Subscribe to:
Comments (Atom)